Modding my MGB-001 (Gameboy Pocket)
The gameboy pocket was a great product of its time and a nice upgrade from the original gameboy, and even today it is still lots of fun, but there are several aspects where it could get even better, these aspects can be upgraded using mods, I will put here the recommended mods in a nutshell.
A quick note before the mods - The gameboy pocket is much smaller than it's parent the original gameboy thus it leaves minimal places for the mods, so I will have to pick only those mods which give me the most benefit with the minimal "cost" in shell space and complicated wirings.
Switch to newer capacitors
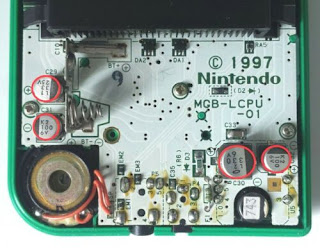
The MGB uses four electrolytic capacitors, these can easily be changed to newer ones renewing an important aspect of the MGB which tends to be problematic after several years
I found several sellers which sell a gameboy pocket capacitor pack with these 4 needed caps - this may make your life easier, or you can just buy (aliexpress?) the following 4 capacitors and install them instead of the existing ones (search for electrolytic capacitors with these specifics)
1 x 33uf 25V (Motherboard location C29)
1 x 330uf 6.3V (or 6V) (Motherboard location C30)
1 x 100uf 6.3V (or 6V) (Motherboard location C31)
1 x 100uf 6.3V (or 6V) (Motherboard location C32)
Screen Bivertion (Bivert/Hex)
The original bivert board (used for the DMG) can be used here, but it is highly unrecommended as it needs some very needed space and uses several wires which run over the whole board.
Thus I recommend the specific mini bivert board printed for the gameboy pocket it is very small and needs no wire at all
5V step-up Power Regulator for the Screen
Simple (yet affective) IPS Lighting
Sound Amplification
Rechargeable (USB-C) Battery
Final thoughts
- Changing of the capacitors as it is very easy and doesn't take additional space
- Mini bivert (no wires!)
- Simple screen lighting (so beneficial)
- Rechargeable battery - this is a must for me even although it takes the most space
- Power decoupler mod 470uF 10V decoupler
- 3.7v to 5v step up power regulator (will use it only if I see power problems)
- CleanAmp (4-5 wires, and not cheap)


Comments