Posts

Showing posts from 2021

Reset trial date of software (Crack Trial Limitations)

 You have a software with a trial of a limited time, but you need to use the software for another period of time, what can you do ? There are several ways to go about this one (You should try them by this order): You should begin with attempting to detect a known trial protection installed in this software, if it is of a known type then maybe there is a known hack for it. Attempt to change the date of the running software - not the date of the computer as a good hack should never interfere with your computer, the right way to go about this is to use Nirsoft's RunAsDate util , or use TimeStopper. Try to find the registry entry which has the installation timestamp - and remove it, for this one I would use Nirsoft's RegScanner  or RegistryFinder Uninstall the application completely (after uninstall also delete all registry entries) for this one I would use Bulk Crap Uninstaller , then install it from scratch Barring all of the above I would reinstall it on a new computer (or VM) a
Play Arcade Games on a Simple Setup at 2021 (October)

 You have the crave to play some quick arcade games, and you want to satisfy it when it comes without fussing with emulators, downloads etc. Just setup a basic small arcade home environment which you can jump to whenever you feel the need. Ingredients Raspberry pie (the brains of the system) SD card (storage of the OS + Roms) HDMI cable USB cable (power for the RP [or use the RJ45 for POE if you use RP 4 or later]) LAN (rj45), keyboard - needed for first setup Screen Joystick of your choice (8bitdo?) Supposing you have cables (hdmi, rj45, usb) lying around, and a screen to use as well as an SD card, then the only needed purchases are the actual raspberry pie and joystick, which don't accumulate to a lot of money. Raspberry pie Unless you want to emulate more modern systems (playstation 2 and up) then you can use a raspberry pie 3 (not even the plus version) and it will satisfy your needs without compromise. Please note that I do recommend buying the RP 3+ as if you will need it for

Modding my MGB-001 (Gameboy Pocket)

Image
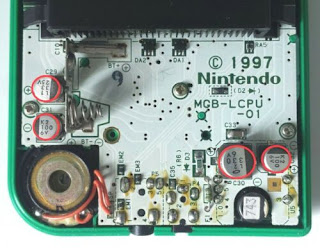
The gameboy pocket was a great product of its time and a nice upgrade from the original gameboy, and even today it is still lots of fun, but there are several aspects where it could get even better, these aspects can be upgraded using mods, I will put here the recommended mods in a nutshell. A quick note before the mods - The gameboy pocket is much smaller than it's parent the original gameboy thus it leaves minimal places for the mods, so I will have to pick only those mods which give me the most benefit with the minimal "cost" in shell space and complicated wirings. Switch to newer capacitors The MGB uses four electrolytic capacitors, these can easily be changed to newer ones renewing an important aspect of the MGB which tends to be problematic after several years I found several sellers which sell a gameboy pocket capacitor pack with these 4 needed caps - this may make your life easier, or you can just buy (aliexpress?) the following 4 capacitors and install them inste

Modding my DMG-01 (Original Classic Gameboy)

Image
 The original gameboy was a great product of its time, and even today it is still lots of fun, but there are several aspects where it could get even better, these aspects can be upgraded using mods, I will put here the recommended mods in a nutshell. Bass Boost Mod This is a simple mod in which I will upgrade the capacitors from 1uF 50v to 10uF 50V. More Power To The Speaker In this mod, I have added a 470uF 10v capacitor to have more speaker power I suggest soldering to the legs of the capacitor two small wires (for each leg one wire), so you can place the capacitor in a place which will be the most comfortable for your gameboy. Speaker Amplifier (Louder Speaker) Rechargeable usb-c Battery (Battery which can be charged using a usb-c cable) Buy a usb-c charging board (TP4056?) and a 3.7v LI-ION battery (1300 mah?), Make sure you have 2 red wires, 1 black and one white 1. Remove all battery connectors from the gameboy case (Desolder 2 of them) 2. Solder red+white wires to left battery c